-
Fundamentals
-
Docs
Libraries
API
Mobile SDK allows you to create mobile apps over the CARTO platform.
This component is still under support but it will not be further developed. We don’t recommend starting new projects with it.
Mobile SDK allows you to create mobile apps over the CARTO platform.
This component is still under support but it will not be further developed. We don’t recommend starting new projects with it.
You need CARTO Enterprise or Enterprise trial account for Mobile SDK. Please contact us for an offer and free trials.
You must register all your mobile apps under your CARTO.com account settings. You’ll get the mobile app license code, which is needed for your app code. There are no limits how many apps you can register, and every platform (also Xamarin iOS and Xamarin Android) is regarded as separate app and needs separate registration.
You can find detailed instructions on API Keys page
1) Install SDK by adding the following to the build.gradle of your project:
1
2
3
4
5
6
  // use the latest version number from https://github.com/CartoDB/mobile-sdk/releases

  dependencies {
      compile 'com.carto:carto-mobile-sdk:4.4.6@aar'
  }
2) Define INTERNET permission for the app in your AndroidManifest.xml
1
2
  <uses-permission android:name="android.permission.INTERNET"/>
3) Define your application layout
Define main layout as res/layout/main.xml, so that it contains com.carto.ui.MapView element:
1
2
3
4
5
6
7
8
9
10
11
12
13
  <?xml version="1.0" encoding="utf-8"?>
  <LinearLayout xmlns:android="http://schemas.android.com/apk/res/android"
      xmlns:tools="http://schemas.android.com/tools"
      android:layout_width="fill_parent"
      android:layout_height="fill_parent"
      android:orientation="vertical" >
     <com.carto.ui.MapView
      android:id="@+id/mapView"
      android:layout_width="fill_parent"
      android:layout_height="fill_parent"
      />
  </LinearLayout>
4) In your app code connect to the MapView object and add a basemap layer
Following enables to load the MapView from the layout. The object itself was already created during the layout creation process, this step is specific to finding and referencing the MapView object in your request.
1
2
3
4
5
6
7
8
9
10
11
12
13
14
15
16
17
18
19
20
21
22
23
24
  public class MainActivity extends Activity {

      // make sure you replace the String value with the one from carto.com mobile app registration !
      final String LICENSE = "YOUR_LICENSE_KEY";

      private MapView mapView;

      @Override
      public void onCreate(Bundle savedInstanceState) {
          super.onCreate(savedInstanceState);
          setContentView(R.layout.main);

          // Register the license so that CARTO online services can be used
          MapView.registerLicense(LICENSE);

          // Get 'mapView' object from the application layout
          mapView = (MapView) this.findViewById(R.id.mapView);

          // Add basemap layer to mapView
          CartoOnlineVectorTileLayer baseLayer = new CartoOnlineVectorTileLayer(CartoBaseMapStyle.CARTO_BASEMAP_STYLE_VOYAGER);
          mapView.getLayers().add(baseLayer);
      }
  }
1
2
3
4
5
6
7
8
9
10
11
12
13
14
15
16
17
18
19
20
21
22
23
24
  class MainActivity : AppCompatActivity() {

      // make sure you replace the String value with the one from carto.com mobile app registration !

      val LICENSE = "YOUR_LICENSE_KEY"

      var mapView: MapView? = null

      override fun onCreate(savedInstanceState: Bundle?) {
          super.onCreate(savedInstanceState)
          setContentView(R.layout.main);

          // Register the license so that CARTO online services can be used
          MapView.registerLicense(LICENSE, this)

          // Get 'mapView' object from the application layout
          mapView = findViewById(R.id.mapView) as MapView

          // Add basemap layer to mapView
          val layer = CartoOnlineVectorTileLayer(CartoBaseMapStyle.CARTO_BASEMAP_STYLE_VOYAGER)
          mapView?.layers?.add(layer)
      }
  }
5) Run the Android app
The map should appear with the default tyle. You can zoom, rotate, and tilt the map with touch.
6) Do something useful with the map - add a styled Marker for a point
1
2
3
4
5
6
7
8
9
10
11
12
13
14
15
16
17
18
19
20
21
22
23
24
25
26
27
28
29
30
31
32

    // this will be used later in several places
    Projection proj = mapView.getOptions().getBaseProjection();

    // 1. Initialize an vector data source where to put the elements
    LocalVectorDataSource vectorDataSource1 = new LocalVectorDataSource(proj);

    // 2. Initialize a vector layer with the previous data source
    VectorLayer vectorLayer1 = new VectorLayer(vectorDataSource1);

    // 3. Add the previous vector layer to the map
    mapView.getLayers().add(vectorLayer1);

    // 4. Set limited visible zoom range for the vector layer (optional)
    vectorLayer1.setVisibleZoomRange(new MapRange(10, 24));

    // 5. Create marker style
    MarkerStyleBuilder markerStyleBuilder = new MarkerStyleBuilder();
    markerStyleBuilder.setSize(30);
    markerStyleBuilder.setColor(new Color(0xFF00FF00)); // green

    MarkerStyle markerStyle1 = markerStyleBuilder.buildStyle();

    // 6. Add marker
    MapPos pos1 = proj.fromWgs84(new MapPos(24.646469, 59.426939)); // Tallinn
    Marker marker1 = new Marker(pos1, markerStyle1);

    // 7. Add the marker to the datasource
    vectorDataSource1.add(marker1);
1
2
3
4
5
6
7
8
9
10
11
12
13
14
15
16
17
18
19
20
21
22
23
24
    // Get base projection from mapView, we'll need it later
    val projection = mapView?.options?.baseProjection

    //1. Create a vector data source where to put the elements
    val source = LocalVectorDataSource(projection)

    // 2. Initialize layer, add to MapView
    val layer = VectorLayer(source)
    mapView?.layers?.add(layer)

    // 3. Create a Marker style, using default marker bitmap here
    val markerStyleBuilder = MarkerStyleBuilder()
    markerStyleBuilder.size = 30F
    markerStyleBuilder.color = Color(0, 255, 0, 255) // green + opacity byte
    val markerStyle1 = builder.buildStyle()

    // 4. Define marker position and create the marker
    val pos1 = projection?.fromWgs84(MapPos(24.651488, 59.423581)) // Tallinn
    val marker1 = Marker(pos1, markerStyle1)

    // 5. Add the marker to the data source
    vectorDataSource1.add(marker1)
1) Create new project. The simplest is to create a new ‘Single View application’ in your Xcode project
2) Configure Cocapod Podfile to load SDK to your project. If you do not use Cocoapod, then you can also load SDK and add as plain .framework to your project structure from the Mobile SDK Releases page.
  // Add to your CocoaPods Podfile:
  // use the latest version number from https://github.com/CartoDB/mobile-sdk/releases
  pod 'CartoMobileSDK', '4.4.6'
3) Load/Update Cocoapods, and open .xcworkspace (instead of xcodeproj) to make use of Cocoapod. Run following in terminal, in your project folder
pod install4) Modify Controller for Map View:
YOUR_LICENSE_KEY with your Mobile App License API, see App Registration above.In Objective-C apps you need some special tricks:
ViewController.m (comes with template) to ViewController.mm, to avoid Objective C++ compilation issues1
2
3
4
5
6
7
8
9
10
11
12
13
14
15
16
17
18
19
20
21
22
import UIKit
import CartoMobileSDK
class ViewController: UIViewController {
override func viewDidLoad() {
super.viewDidLoad()
// The initial step: register your license.
let license = "YOUR_LICENSE_KEY"
NTMapView.registerLicense(license)
// MapView initialization in code: initialize and set it as view
let mapView = NTMapView()
view = mapView
let baseLayer = NTCartoOnlineVectorTileLayer(style: NTCartoBaseMapStyle.CARTO_BASEMAP_STYLE_VOYAGER)
mapView?.getLayers().add(baseLayer)
}
}
1
2
3
4
5
6
7
8
9
10
11
12
13
14
15
16
17
18
19
20
21
22
23
24
25
26
27
28
29
30
31
32
33
34
35
36
37
38
  // ViewController.h
  #import <UIKit/UIKit.h>

  @interface ViewController : UIViewController

  @end


  // ViewController.mm
  #import "ViewController.h"
  #import <CartoMobileSDK/CartoMobileSDK.h>

  @implementation ViewController

  - (void)loadView {
    // 1. The initial step: register your license.
    // **Note:** This must be done before using MapView
    [NTMapView registerLicense:@"YOUR_LICENSE_KEY"];
    [super loadView];
  }


  - (void)viewDidLoad
  {
    [super viewDidLoad];

    // 1. Ensure the storyboard has NTMapView connected as a view
    NTMapView* mapView = (NTMapView*) self.view;

    // 2. Create online vector tile layer, use style asset embedded in the project
    NTVectorTileLayer* baseLayer = [[NTCartoOnlineVectorTileLayer alloc] initWithStyle: NT_CARTO_BASEMAP_STYLE_VOYAGER];

    // 3. Add vector tile layer
    [[mapView getLayers] add:baseLayer];
  }

  @end
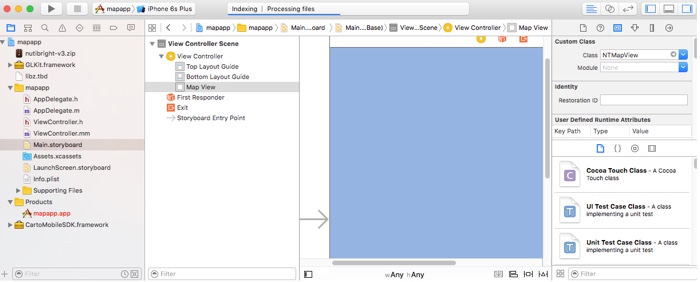
5) Modify Storyboard to enable Map View
The default storyboard template uses UIView class, you must use NTMapView class instead:
Note: If you are using both iPhone (Main_iPhone.storyboard) or iPad (Main_iPad.storyboard) files for iOS, you must repeat the steps to change the default storyboard.
6) Run the iOS app
The map should appear with Voyager style, as defined in your ViewController. You can zoom, rotate, and tilt with multi-touch.
7) Add a Marker to the map to do something useful with the map
1
2
3
4
5
6
7
8
9
10
11
12
13
14
15
16
17
18
19
20
21
22
23
24
25
26
27
28
29
30
31
32
33
34
35
36
37
38
39
40
41

    // MapView initialization in code: initialize and set it as view
    let mapView = NTMapView()
    view = mapView

    // Get base projection from mapView
    let projection = mapView?.getOptions().getBaseProjection()

    // Create a vector data source, bucket where we'll put objects
    let source = NTLocalVectorDataSource(projection: projection)

    // Initialize layer
    let layer = NTVectorLayer(dataSource: source)

    // Add layer
    mapView?.getLayers().add(layer)

    // Define marker location. Make sure to use projection fromWgs84 to have proper coordinate system
    let tallinn = projection?.fromWgs84(NTMapPos(x: 24.646469, y: 59.426939))

    // Create a vector data source, bucket where we'll put objects
    let source = NTLocalVectorDataSource(projection: projection)

    // Initialize layer with datasource, add it to MapView
    let layer = NTVectorLayer(dataSource: source)
    self.getLayers().add(layer)

    // define marker style
    let builder = NTMarkerStyleBuilder()
    builder?.setSize(15)
    builder?.setColor(NTColor(r: 0, g: 255, b: 0, a: 255)) // green, alpha = no transarency

    // create marker and add to DataSource
    let marker = NTMarker(pos: tallinn, style: builder?.buildStyle())
    source?.add(marker)

    // zoom map view focus to the marker
    mapView?.setFocus(tallinn, durationSeconds: 0)
    mapView?.setZoom(15, durationSeconds: 0)
1
2
3
4
5
6
7
8
9
10
11
12
13
14
15
16
17
18
19
20
21
22
23
24
25
26
27
28
29
30

    // we'll need projection later
    NTEPSG3857* proj = [[NTEPSG3857 alloc] init];

    // 1. Create a vector data source, bucket where we'll put objects
    NTLocalVectorDataSource* vectorDataSource1 = [[NTLocalVectorDataSource alloc] initWithProjection:proj];

    // 2. Initialize a vector layer with the previous data source
    NTVectorLayer* vectorLayer1 = [[NTVectorLayer alloc] initWithDataSource:vectorDataSource1];

    // 3. Add the previous vector layer to the map
    [[self getLayers] add:vectorLayer1];

    // 4. Set visible zoom range for the vector layer (optional)
    [vectorLayer1 setVisibleZoomRange:[[NTMapRange alloc] initWithMin:10 max:24]];

    // 5. Create a marker style, using default marker bitmap here
    NTMarkerStyleBuilder* markerStyleBuilder = [[NTMarkerStyleBuilder alloc] init];
    [markerStyleBuilder setSize:30];
    [markerStyleBuilder setColor:[[NTColor alloc] initWithColor:0xFF00FF00]]; // green
    NTMarkerStyle* markerStyle1 = [markerStyleBuilder buildStyle];

    // 6. Define marker position and create the marker
    NTMapPos* pos1 = [proj fromWgs84:[[NTMapPos alloc] initWithX:24.651488 y:59.423581]]; // Tallinn
    NTMarker* marker1 = [[NTMarker alloc] initWithPos:pos1 style:markerStyle1];

    // 7. Add the marker to the data source
    [vectorDataSource1 add:marker1];
Preparation steps:
1) Create a project for your apps
Each platform needs to be registered as its own app, and app UI is created separately. However, when executing API requests with the Mobile SDK, you can create one Xamarin project for Android and iOS and share the code. Some exceptions apply in regards to API calls which need Android context, or file system references. For example, the following API requests are platform specific:
MapView.RegisterLicense()new CartoPackageManager()Almost all of the map related API code - such as adding layers and objects to map, handling interactions and clicks, etc. can be shared for iOS and Android through one project.
2) Add library : to iOS app add nuget CartoMobileSDK.iOS and to Android app add nuget CartoMobileSDK.Android
Setup on different platoforms is a bit different:
Xamarin Forms (version 3.3.0 and higher) support Native Controls. If you add Mobile SDK apps for iOS and Android platforms, Xamarin Native Controls is available by default. See the blog Embedding Native Controls into Xamarin.Forms for details.
While you can share most of code using Native Controls, you just need to specify the platform when creating the project:
1
2
3
4
5
6
7
8
9
10
11
 #if __IOS__
  // 1. iOS specific code
  var mapView = new Carto.Ui.MapView();
  mapView.Frame = new CGRect(20, 20, 280, 80);
  stack.Children.Add(mapView);
 #endif

  // 2. Indicate the common code from both platforms
  var baseLayer = new Carto.Layers.CartoOnlineVectorTileLayer(CartoBaseMapStyle.CartoBasemapStyleVoyager);
  mapView.Layers.Add(baseLayer);
Note: Native Controls only work if you create or update Form in the code, using the xaml definition will not work. This Xamarin development requirement is subject to change with each release. Mobile SDK with Xamarin Forms is currently in being tested with Native apps. .
Follow these steps to add native apps to your Xamarin Android package.
1) Add MapView to your application main layout
  <LinearLayout xmlns:android="http://schemas.android.com/apk/res/android"
      android:layout_width="fill_parent"
      android:layout_height="fill_parent"
      android:orientation="vertical" >
     <carto.ui.MapView
      android:id="@+id/mapView"
      android:layout_width="fill_parent"
      android:layout_height="fill_parent"
      />
  </LinearLayout>
2) Create MapView object, add a base layer
Load layout from a xml, and load the MapView from Layout. You can also create MapView with code. A definition of a base layer is enough for minimal map configuration.
1
2
3
4
5
6
7
8
9
10
11
12
13
14
15
16
17
18
19
20
21
22
23
24
25
26
27
28
  using Carto.Ui;
  using Carto.Layers;
  using Carto.DataSources;

  [Activity (Label = "Carto.HelloMap", MainLauncher = true)]
  public class MainActivity : Activity
  {
      protected override void OnCreate(Bundle bundle)
      {
          base.OnCreate(bundle);

          // 1. Register license BEFORE creating MapView (done in SetContentView)
          MapView.registerLicense("YOUR_LICENSE_KEY", this);

          /// 2. Set our view from the "main" layout resource
          SetContentView(Resource.Layout.Main);

          /// 3. Get our map from the layout resource
          var mapView = FindViewById<MapView>(Resource.Id.mapView);

          /// 4. Online vector base layer
          var baseLayer = new CartoOnlineVectorTileLayer(CartoBaseMapStyle.CartoBasemapStyleVoyager);

          /// 5. Set online base layer
          mapView.Layers.Add(baseLayer);
      }
  }
Follow these steps to add apps to your Xamarin iOS package.
1) Add Map object to app view. In the example below, it is assumed that the outlet name of the map view is Map.
2) Initiate map, set base layer
Add into MainViewController.cs:
1
2
3
4
5
6
7
8
9
10
11
12
13
14
15
16
17
18
19
20
21
22
  using Carto.Ui;
  using Carto.Layers;
  using Carto.DataSources;

  public class MainViewController : UIKit.UIViewController
  {
      public override void ViewDidLoad ()
      {
          base.ViewDidLoad();

          // Register license BEFORE creating MapView
          MapView.RegisterLicense("YOUR_LICENSE_KEY");

          // Online vector base layer
          var baseLayer = new CartoOnlineVectorTileLayer(CartoBaseMapStyle.CartoBasemapStyleVoyager);

          // Set online base layer.
          // Note: assuming here that Map is an outlet added to the controller.
          Map.Layers.Add(baseLayer);
      }
  }
This, as given before, is cross-platform code, covering both Xamarin and UWP:
1
2
3
4
5
6
7
8
9
10
11
12
13
14
15
16
17
18
19
20
21
22
23
24
25
26
27
28
    // projection will be needed later
    Projection proj = MapView.Options.BaseProjection;

    // 1. Initialize an local data source - a bucket for your objects created in code
    LocalVectorDataSource vectorDataSource1 = new LocalVectorDataSource(proj);

    // 2. Initialize a vector layer with the previous data source
    VectorLayer vectorLayer1 = new VectorLayer(vectorDataSource1);

    // 3. Add the previous vector layer to the map
    MapView.Layers.Add(vectorLayer1);

    // 4. Set limited visible zoom range for the vector layer (optional)
    vectorLayer1.VisibleZoomRange = new MapRange(10, 24);

    // 5. Create marker style
    MarkerStyleBuilder markerStyleBuilder = new MarkerStyleBuilder();
    markerStyleBuilder.Size = 30;
    markerStyleBuilder.Color = new Color(0, 255, 0, 255); // green
    MarkerStyle markerStyle1 = markerStyleBuilder.BuildStyle();

    // 6. Define marker position and create the marker
    MapPos pos1 = proj.FromWgs84(new MapPos(24.646469, 59.426939)); // Tallinn
    Marker marker1 = new Marker(pos1, markerStyle1);

    // 7. Add the marker to the datasource
    vectorDataSource1.Add(marker1);
Regardless of the name, CARTO Mobile SDK works also in Windows 10 desktop apps, assuming that they are created as modern UWP apps and not classic winapi apps.
Note: The UWP implementation of the Mobile SDK is experimental.
As app ID use same UUID as in your project’s Package.appmanifest > Packaging > Package name. For example, the sample app ID is c882d38a-5c09-4994-87f0-89875cdee539
1) Add the nuget package CartoMobileSDK.UWP to your app project
2) Create MapView object, and add a base layer
It is much simpler to create a MapView object with code. A definition of a base layer is enough for the minimal map configuration.
1
2
3
4
5
6
7
8
9
10
11
12
13
14
15
16
17
18
19
20
21
22
23
24
25
26
27
28
29
30
31
32
33
34
35
36
37
  using Carto.Core;
  using Carto.Graphics;
  using Carto.DataSources;
  using Carto.Projections;
  using Carto.Layers;
  using Carto.Styles;
  using Carto.VectorElements;

  sealed partial class App : Windows.UI.Xaml.Application
  {
      protected override void OnLaunched(LaunchActivatedEventArgs e)
      {
          if (mapView == null)
          {
              // 1. Register CARTO app license
              Carto.Ui.MapView.RegisterLicense("YOUR_LICENSE_KEY");

              // 2. Create map view and initialize
              mapView = new Carto.Ui.MapView();

              // 3. Online vector base layer
              var baseLayer = new CartoOnlineVectorTileLayer(CartoBaseMapStyle.CartoBasemapStyleVoyager);

              // 4. Set online base layer.
              // Note: assuming here that Map is an outlet added to the controller.
              mapView.Layers.Add(baseLayer);
          }

          // Place the page in the current window and ensure that it is active.
          Windows.UI.Xaml.Window.Current.Content = mapView;
          Windows.UI.Xaml.Window.Current.Activate();
      }

      private Carto.Ui.MapView mapView;
  }
3) Add Marker points to the map
See sample code above under Xamarin section. The code is exactly the same.