

This content applies to a previous version of CARTO
In October 2021 we released a new version of our platform. You can find the latest documentation at docs.carto.com
How can I add icons to Builder legends?
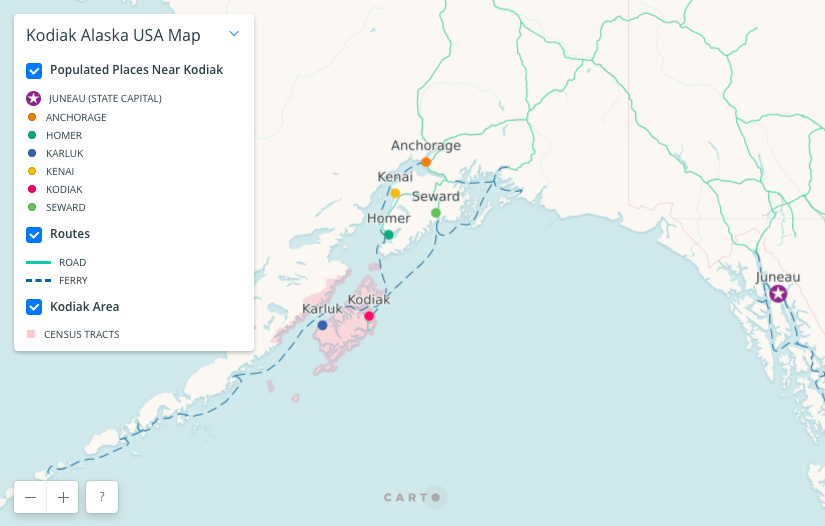
CARTO Builder gives you the ability to symbolize point features with images. As a best practice to ensure legibility, you should make your Legend symbols match your point marker icons. This can be done in Builder with custom HTML. You can also represent line features with a Legend line, and polygon features with a Legend square.
Add an icon to your Legend
You can use the same image for your point marker style and your Legend.
After you finish styling your point markers with images, make sure your
STYLEpanel toggle is set toCARTOCSS. Copy the url you find inside quotes in themarker-filedefinition.For example, the star marker uses this CartoCSS style rule:
marker-file: ramp([name], (url("https://s3.amazonaws.com/com.cartodb.users-assets.production/production/documentation/assets/20190513213949star.svg")), ("Juneau"), "=");From there copy this link to the star image:
https://s3.amazonaws.com/com.cartodb.users-assets.production/production/documentation/assets/20190513213949star.svgClick on the layer’s
LEGENDpanel. Select theCUSTOMthumbnail in theSelect stylesection of theCOLORpanel.The Legend items auto-populate based on your current styles. If you are using custom CartoCSS and the Legend items don’t auto-populate, click
ADD ITEMand select the appropriate colors.For each item, a point icon will appear in the Legend by default.
Set the
LEGENDpanel toggle toHTML. Find the<p>element that contains the title of the item that you are symbolizing with an image.Above that you should see a
<span>element similar to this:<span class="Legend-categoryCircle" style="opacity:1; background: #7F3C8D;"></span>Replace that
<span>element with the line below.<span style="opacity:1; height:15px; width:15px; background-image: url('https://s3.amazonaws.com/com.cartodb.users-assets.production/production/documentation/assets/20190513213949star.svg') no-repeat center; background-size: 15px 15px;"></span>Replace the
srcurl with the one you copied from yourmarker-filestyle and clickAPPLY.You can also change the pixel sizes as needed to accommodate your icon’s dimensions.
Add a square to your Legend
Take the steps below to create a square icon in your Legend.
Open your map in your CARTO dashboard and click on your layer’s card to open it.
Click on your map layer’s
LEGENDtab and select theCUSTOMthumbnail in theSelect stylesection of theCOLORpanel. Notice that a point icon appears in the Legend by default.Enter a label in the field next to the color bar in the
Creating your legendsection.Notice that you can enter field text with lower or upper case characters, but it always appears in upper case in the Legend.
Set the
COLORpanel’s toggle toHTML. You will see aspanelement that looks similar to this:<span class="Legend-categoryCircle" style="opacity:1; background: #826DBA;"></span>Replace that span element with the one below. It adds an 8 pixel by 8 pixel square to the legend and gives it a white outline to match the Legend’s white background.
Change the
backgroundcolor to the same one you’re using for your map feature. You can copy the feature’s hex color code from the color pickerHEXvalue, which is visible when you click on the layerSTYLEpanel’sPOLYGON COLORcolor bar.<span style="opacity:1; border:1px solid #ffffff; background: #f1ccd0; height:8px; width:8px; display:inline-block"></span>After changing the
backgroundcolor clickAPPLY.
Add a line to your Legend
Take the steps below to create line icons in your Legend.
Open your map in your CARTO dashboard and click on your layer’s card to open it.
Click on your map layer’s LEGEND tab and select the CUSTOM thumbnail in the Select Style section of the COLOR panel.
In the
LEGENDpanel’sCreating your legendsection you should make sure an item has been added for each of the different symbols used in your layer. Click on the color bar for each item and set its color to the same one used in your STYLE panel.Enter a label in the field next to the color bar in the
Creating your legendsection.Set the
COLORpanel’s toggle toHTML. You will see aspanelement for each of your items.Comment them out by enclosing each span element in a
<!--and-->.<!-- <span class="Legend-categoryCircle" style="opacity:1; background: #4cc8a3;"></span> -->Beneath the commented-out span element paste the code below.
This creates a 25px wide rectangle with a bottom border that is 3px tall. This represents the line icon.
<span style="opacity:1; border-bottom:3px solid #4cc8a3; background:#FFF; height:1px; width:25px; display:inline-block"></span>The color of your line icon is controlled by the
border-bottomcolor property. The commented-out span elements already include thebackgroundcolors needed for your lines.Copy the
backgroundhex color from the span element commented out. In the span element you just added beneath it, paste the color code into theborder-bottomhex # value.For dashed lines, paste the code below and click
APPLY.<span style="opacity:1; border-bottom:3px dashed #1d6996; background:#FFF; height:1px; width:25px; display:inline-block"></span>To match the map feature’s line dash pattern exactly and consistently across browsers you can use a dashed image in the Legend. It would be implemented the same way as the icon example above.