Editor Dataset Basics
Learn how to work with data in Editor.
Behind the scenes, the CARTO geospatial database is built on the PostgreSQL platform and supports advanced PostGIS capabilities. When you import data with the CARTO Editor, you are connecting a dataset to a standard database.
Connect Dataset
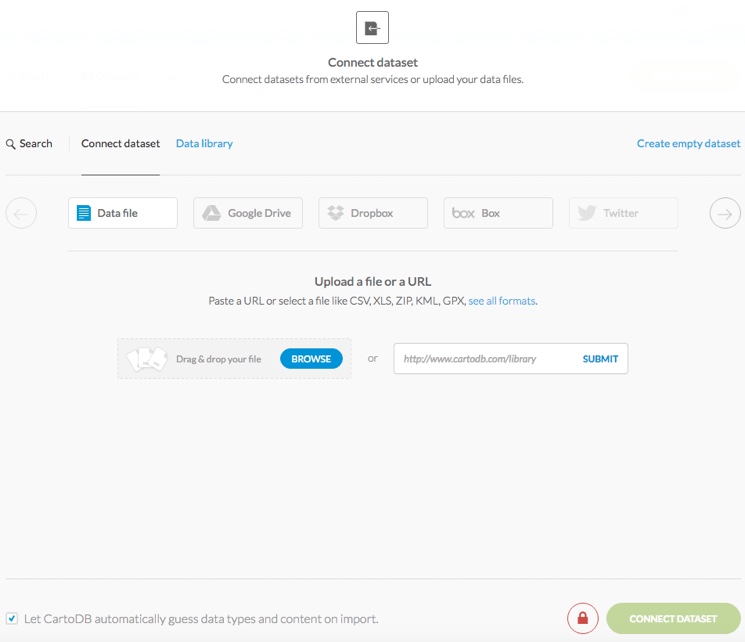
You can import data from a local file (or public URL), connect to an external dataset, or create an empty dataset.
- Visit the Data page
-
Click New Dataset
Tip: For details about the Let CARTO automatically guess data types and content on imports behavior, see Import Guessing for details.
-
Click the type of dataset you want to connect to
Tip: Use the arrow buttons to scroll for more options.
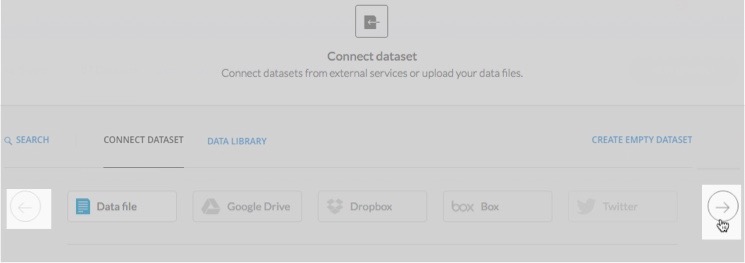
The following connect dataset options are available.
Connect Dataset Description Data file Drag and drop a file directly onto the Connect dataset dialog to add it, or click BROWSE to select a local file to upload. You can also enter and submit a public URL to upload data from.
Tip: See a list of Supported Geospatial Data Formats.Google Drive Connect a dataset by syncing to an external Google Drive. For details, see Syncing Datasets.
Note: The external data sources that appear are managed by CARTO (see step 5 of this procedure).
- First, you must enable the Google Drive Connect to external data sources option, available from your account options
- Once you allow access to your account, you can connect to your Google Drive through the connect dataset optionsDropbox Connect to a dataset by syncing to a external Dropbox. For details, see Syncing Datasets. Some file formats are not supported with Dropbox. Select Dropbox to view which file formats are available (CSV, XLS).
Note: The external data sources that appear are managed by CARTO (see step 5 of this procedure).
- First, you must enable the Dropbox Connect to external data sources option, available from your account options
- Once you allow access to your account, you can connect to your Dropbox through the connect dataset optionsBox Connect a dataset by syncing to an external box files. Select Box to view which file formats are available (CSV, XLS). You can access your Box account, upload secure files and content, and sync your datasets.
Note: The external data sources that appear are managed by CARTO (see step 5 of this procedure).
- First, you must enable the Box Connect to external data sources option, available from your account options
- Once you allow access to your account, you can connect to your Box account through the connect dataset options
Tip: There is known issue when requesting parallel Box imports; the first import may fail and the second succeeds. This is due to the access and request tokens from the Box connector. CARTO is aware of this and is working to improve this behavior. For best practices, import one Box file at a time to avoid errors.
Additionally, it may take some time for your new Box files to appear in the CARTO import list, due to Box Search API latency issues. -
For any external services, you must enable these connectors before you can connect to an external dataset
Note: This one-time step requires that you contact Carto for assistance. Once your external connectors have been enabled for your account, connect your external service and link it to your account.
-
For any external data sources, click Connect from the the Connect to external data source section of your account options
Tip: Ensure that your browser pop-up blocker is disabled when connecting.
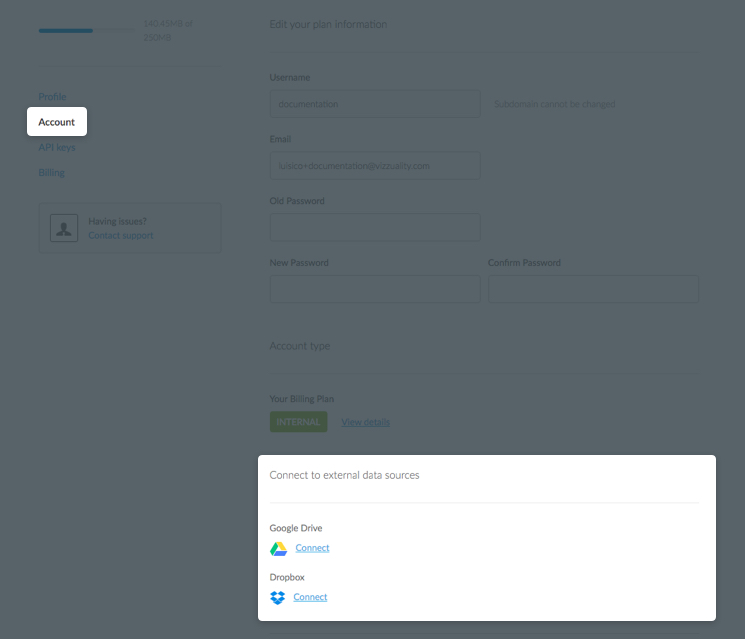
After your external connectors are enabled and connected, the connect dataset options allow you to import external data and activates the CONNECT DATASET button.
-
Click CONNECT DATASET
Tip: There is a shortcut to set the dataset privacy option. By default, your dataset is private.
-
Click the icon to toggle between public and private, before connecting your dataset
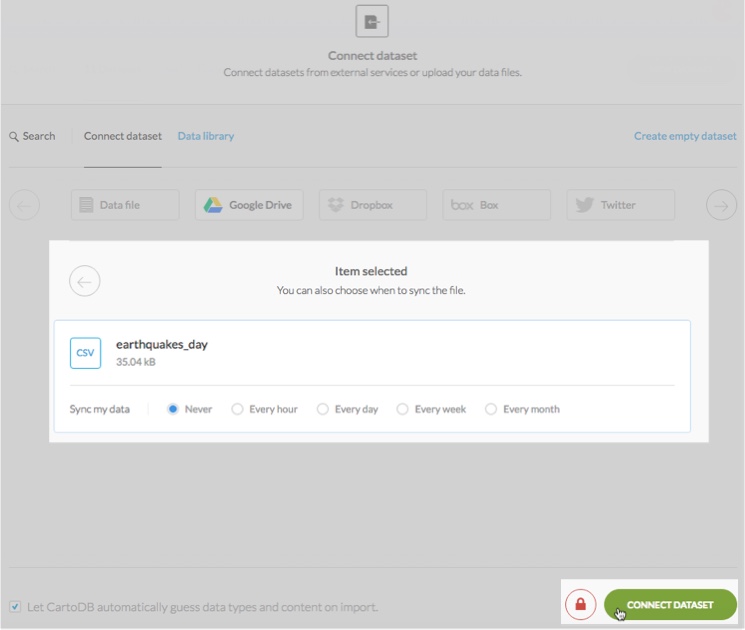
Your data (or external dataset) is imported and uploaded to your datasets dashboard. If your import fails, see Import Errors for a list of known errors and solutions.
Create an Empty Dataset
Optionally, you can add data manually or programmatically, with the Connect Dataset option.
- Visit the Data page.
-
Click New Dataset.

-
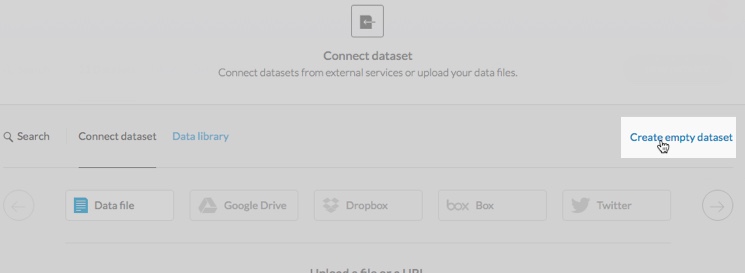
Click Create empty dataset
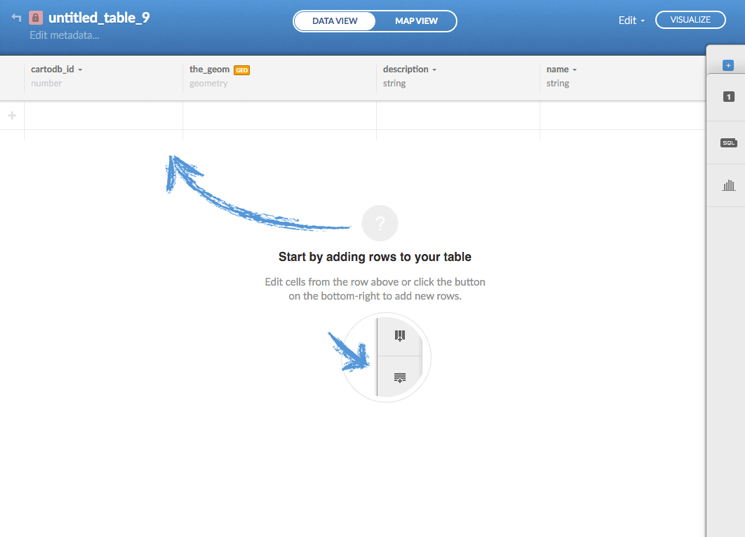
A blank dataset containing the default CARTO columns and indexes are created and formatted.
-
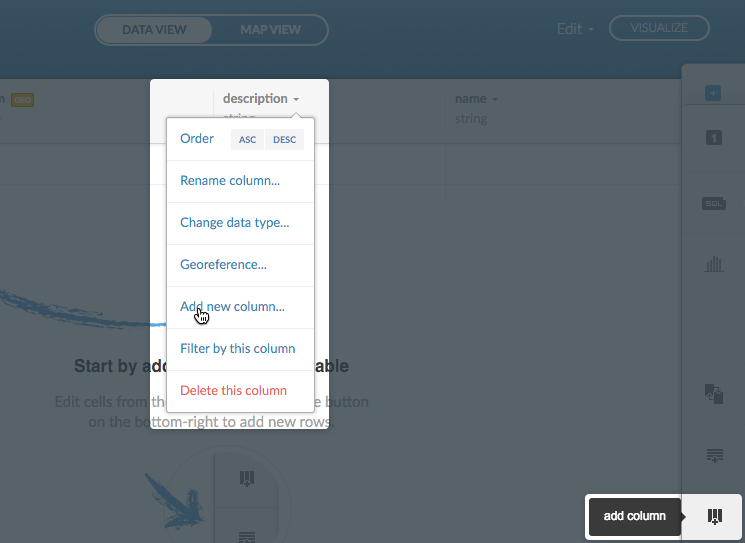
Add rows and columns to your dataset with the CARTO sidebar options, or by using the context menu items
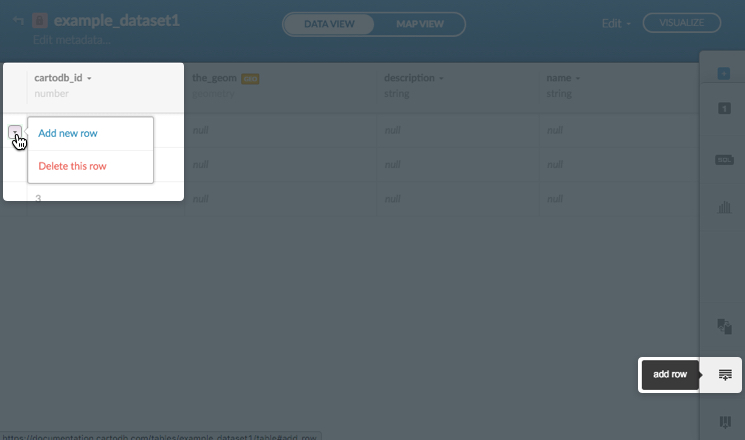
For example, the following options display how to add a row
Additionally, you can add point, line, and polygon coordinates to your dataset with the Add Feature option, available from the MAP VIEW of the CARTO sidebar. For details, see Add Feature.
Locating Geospatial and Mappable Data
Ideally, you will upload your own location-based data to CARTO and create maps. If you do not have any data, or if you need help locating geospatial and mappable data, CARTO recommends the following external resources. If you an Enterprise user, you can also use our Data Observatory catalog.
| Data Resource | Description |
|---|---|
| AirData Beta | Open data for international development |
| Buenos Aires Data | Buenos Aires Open Data Portal |
| Center for National Geographic Information | Download center for National Center for Geographic Information (CNIG) |
| Columbia University Geospatial Datasets | Digital Social Sciences Center for New York City Numeric and Spatial Data |
| GeoBlacklight | A multi-institutional open-source collaboration building a better way to find and share geospatial data |
| GeoGig | Open source geospatial data management tool |
| Global Administrative Areas | Spatial database of the world’s administrative areas and boundaries |
| The Global Biodiversity Information Facility | GBIF provides a portal to thousands of collections, and millions of biodiversity records, for nature-based data |
| Global Forest Watch | Global Forest Watch open data portal, partnered with the World Resources Institute |
| Global Terrorism Database | Database information of domestic and international terrorist events around the world |
| The Guardian Datablog | Analysis of popular American and international news resources |
| Harvard Election Data Archive | Excellent source of elections data for races around the United States |
| HUD.gov | U.S. Department of Housing and Urban Development (HUD) datasets. Additionally, view HUD opendata |
| IDEE Metadata Catalog | The Spanish Spatial Data Infrastructure catalogue of geographical metadata |
| International GIS Data | University of Pennsylvania International library of GIS data |
| International Monetary Fund | IMF eLibrary of datasets and publications |
| Land Matrix | Land Matrix data points by targeted region |
| List of GIS data sources | A list of GIS data sources (and geoportals) from Wikipedia |
| National Weather Service GIS Data Portal | National Weather Service downloadable datasets in GIS formats (shapefile, web services, and KML) |
| Natural Earth Data | Data for borders, coastlines, cities, and many other useful collections |
| New York City DOT | NYC Department of Transportation open data access |
| New York City Polygons | NYC Department of City Planning district and metadata shapefiles |
| NYC OpenData | New York City datasets including information about business, government, education, environment, health, housing, and so on |
| Open Data BCN | Open data catalog from Barcelona’s City Hall service |
| OpenDataCache | A list of cities with open data portals. Note: Most of this data is not explicitly geographic, but useful if you want to use this data as a resource to create your own datasets |
| OpenStreetMap | City data, including polygons for neighborhoods and cities, roads, and even lampposts |
| Organisation for Economic Co-operation and Development | OECD publisher of books and journals related to countries, economic surveys, and public policy data |
| OSM Building Footprints | Interactive example of an overpass turbo query |
| Points Data | The “all_month.csv” download file, containing example earthquake data |
| Portal de Datos abiertos del Ayuntamiento de Madrid | Open data catalog provided by the Madrid City Council |
| United Nations | UN public databases and country data services information |
| United Nations WHO | United Nations World Health Organization data repository for Global Health Observatory (GHO) data |
| US Census American Fact Finder | A step-by-step guide from the United State Census Bureau for locating and downloading geography datasets |
| US Census Tiger Boundary Files | Spatial extracts from TIGER (Topologically Integrated Geographic Encoding and Referencing) products |
| US Climate Data | Data and resources related to climate change, provided by Data.GOV |
| US Election Data | The Harvard Election Data Archive website, which contains data from United States elections |
| US Federal Reserve Economic Data | Economic research data from the Federal Reserve Bank of St. Louis, Missouri |
| US Government | The home of the U.S. Government’s open resources for data related to agriculture, ecosystems, education, health, finance, energy and so on |
| USGS National Atlas | The National Map source for topographic information |
| World Bank | World bank open data about development in countries around the globe |
| World Geospatial Datasets | Countries, cities, codes, flags, languages, latitude/longitude, etc. |
Syncing Datasets
Depending on your account type, you can sync datasets by connecting to an external Google Drive or Dropbox. You can even connect and sync data with a public URL. This high-level overview describes the workflow for syncing datasets. Additionally, when connecting to a dataset from the CARTO data library, these sync options also appear.
Tip: For details about connecting to external data sources, see the Connect Dataset procedure.
- Create a new dataset and select Google Drive or Dropbox as the external service
- After your external connectors are enabled and connected, the connect dataset options display a list of your Google Drive, Dropbox or Box files
-
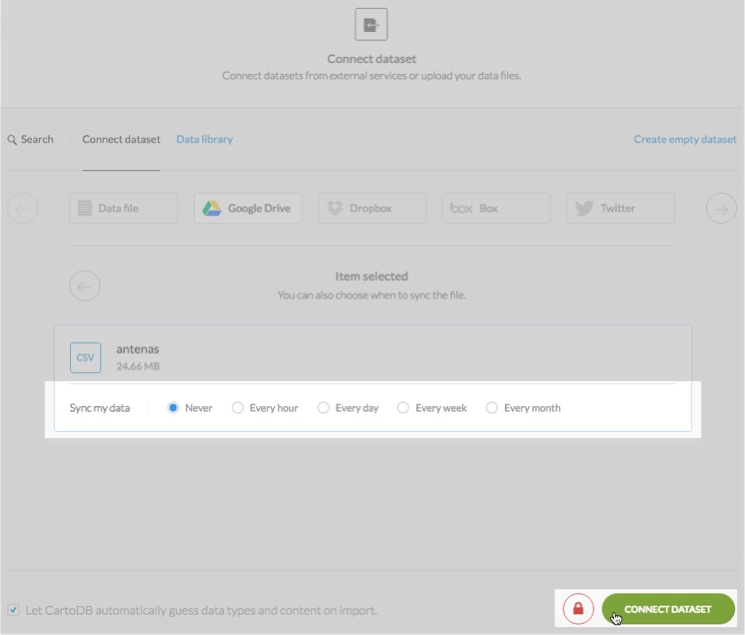
Choose which external files you want to import and select the Sync my data options
Tip: For details about the Let CARTO automatically guess data types and content on imports behavior, see Import Guessing for details.
-
Click CONNECT DATASET
Tip: There is a shortcut to set the dataset privacy option. By default, your dataset is private. Click the icon to toggle between public and private before, connecting your dataset.
- Optionally, you can change these sync dataset options at anytime
Note: Contact Sales if you need help enabling this feature for your account.
Sync Dataset Options
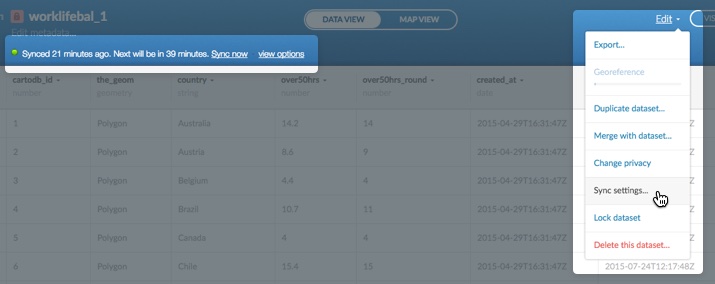
If you have applied sync settings for your dataset, the shortest automatic syncing interval is every one hour. Optionally, you can force a manual synchronization up to every 15 minutes. The example image below shows the Sync settings option, located from the Edit menu of your datasets dashboard. Once a dataset is synced, the sync status appears above your table in the Data View.
-
Click Sync now to sync your data in real time.
-
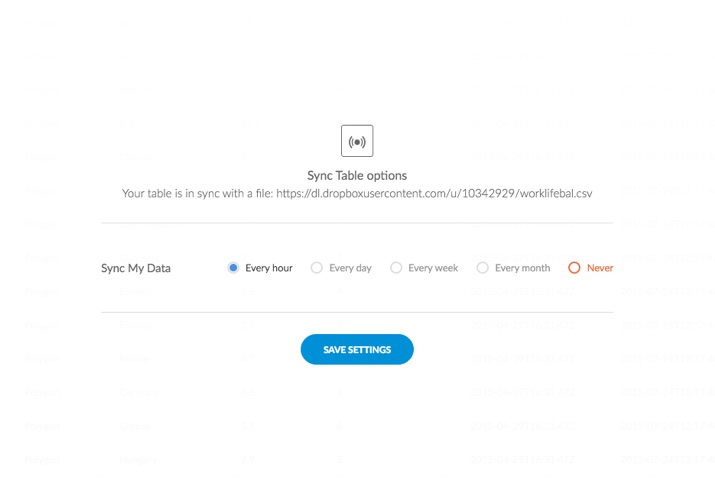
Alternatively, click view options to open the Sync Table options and select the sync settings.
Supported Geospatial Data Formats
CARTO supports a large number of data types and file formats. For details about the type of data that you can import, see Supported Geospatial Data Format.
Tip: It is high recommended that you compress your files before importing them. CARTO supports .ZIP and .GZ (which includes .TAR.GZ and .TGZ) for compressing and archiving files.
If you are importing a non-supported file type, the import will fail. See Import Errors for a list of known error codes and solutions.
Manage Your Datasets
You can manage all of your datasets from your Datasets dashboard and change how the datasets are ordered, edit the privacy settings for your datasets, or delete a dataset.
Changing the Sort Order of your Datasets
The following procedure describes how to change the sort order of your datasets from your datasets dashboard.
-
Click Your datasets from your dashboard drop-down menu
The datasets view appears, displaying all your datasets ordered by date.
-
Use the datasets toolbar to change how your datasets appear

The following sort options are available from the datasets toolbar.
| Sort Options | Description |
|---|---|
 |
Order by date. This is the default setting and indicates the date that the dataset was created or imported |
 |
Order by visits. This is only applicable for your public shared maps |
 |
Order by likes |
 |
Order by size. This is the size of your dataset |
Your dashboard refreshes, changing the sort order of how your datasets appear.
Dataset Privacy
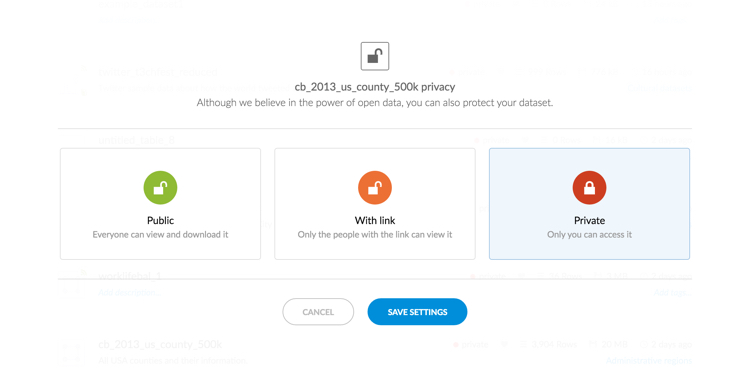
You can protect your dataset and identify the privacy option as Public, With link, or Private. The dataset privacy options are managed through the dataset metadata.
Note: Dataset privacy is stored separately from Map privacy. This enables you to protect each layer of data within a map.
The following image, and table, display the available dataset privacy options.
| Dataset Privacy Option | Description |
|---|---|
| Public | Available to anyone on the internet and viewable from your public profile page on CARTO |
| With link | Only accessible to anyone that has the shared link to the dataset |
| Private | A private dataset that is only visible to you |
There are multiple ways to access these dataset privacy options.
Note: Different privacy options may appear, depending on your account settings.
Edit the Dataset Privacy Settings when Connecting a Dataset
There is a shortcut to set the dataset privacy while connecting a new dataset. See the Connect Dataset procedure for complete details about how to connect a dataset.
-
From the connect dataset options, click the privacy icon to toggle between the public and private option
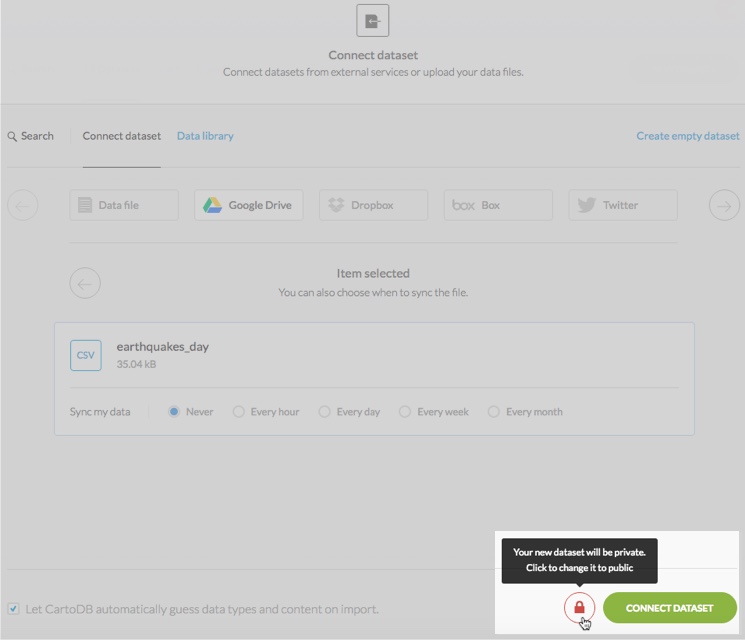
Note Datasets are private by default.
-
Click the privacy icon to change the dataset to public
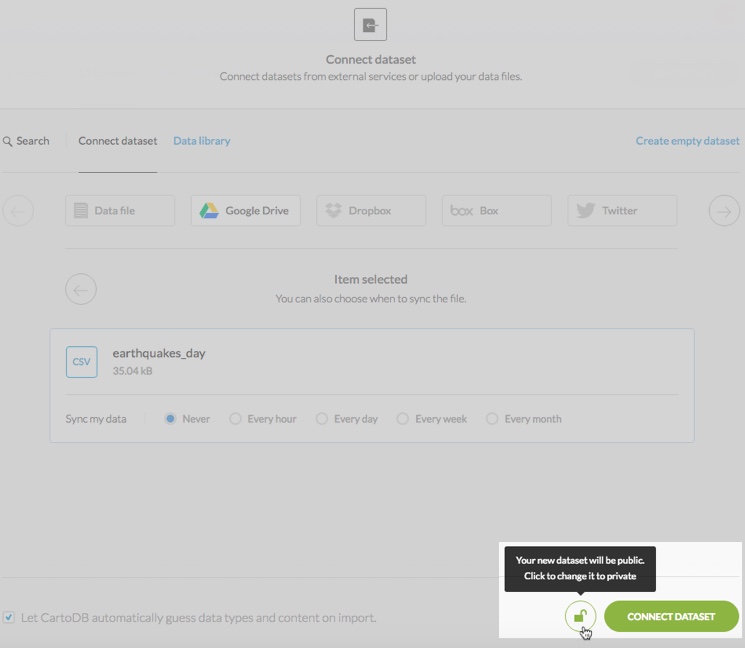
Once you connect a dataset, you can change the privacy at any time by using the dashboard or dataset options, as described in the this section.
Edit the Dataset Privacy Settings from your Dashboard
The following procedure describes how to edit the dataset privacy settings from your datasets dashboard.
-
Click Your datasets from your dashboard drop-down menu
The datasets view appears, displaying all your datasets.
-
Select the privacy setting for a dataset
You can click Change privacy from the shortcut options that appear when a dataset is selected, or click the privacy setting directly from a named dataset.
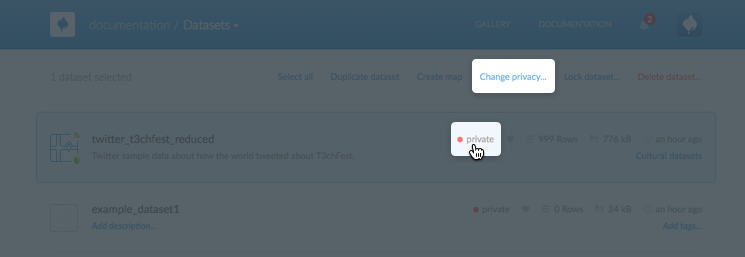
The privacy options appear, from which you can change and save your settings.
Edit the Dataset Privacy Settings from a Selected Dataset
There are several ways to edit the privacy settings within the Data View or Map view for a selected dataset.
-
Visit the Data page
-
Click the name of a dataset
The selected dataset opens in the Data View. You can open the privacy options from the Edit menu and from the lock icon. Additionally, you can access the privacy options from within the Edit metadata options.
2a. Click Change privacy from the Edit menu.
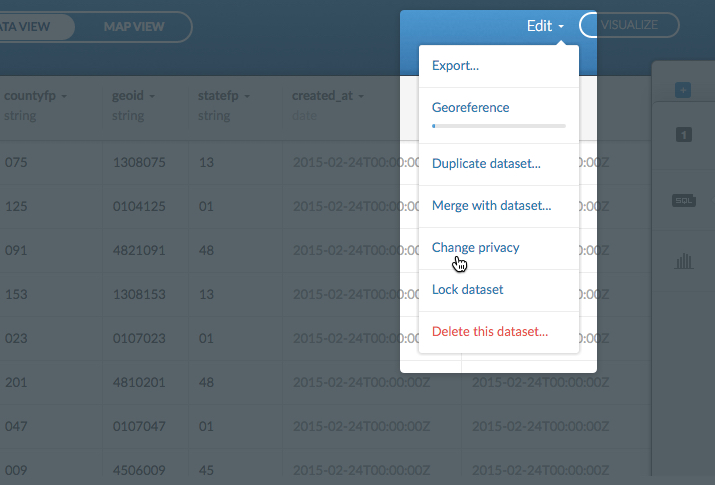
The privacy options appear, from which you can change and save the privacy setting.
2b. Click the lock icon, next to the name of the dataset.
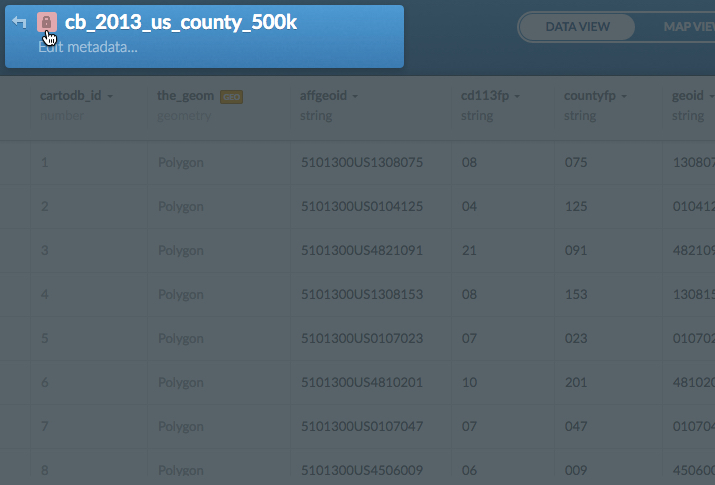
The privacy options appear, from which you can change and save the privacy setting.
2c. Click Edit metadata
The Dataset metadata options appear, from which you can click the privacy setting to open the privacy options to change and save your settings.
Dataset Metadata
You can edit the attributes for each dataset and add metadata for your data. This is useful for keeping your datasets organized and discoverable in a search, as your repository of datasets increases. You can edit dataset metadata from your datasets dashboard.
Note: The dataset metadata is stored separately from your map metadata.
Editing Metadata for a Dataset
-
Visit the Data page
-
Click the name of a dataset
The selected dataset opens in the Data View.
-
Click Edit metadata

The Dataset metadata options appear.
-
Edit the dataset name, description, source, attributions. license, and tags for the selected dataset. You can also change your dataset privacy settings
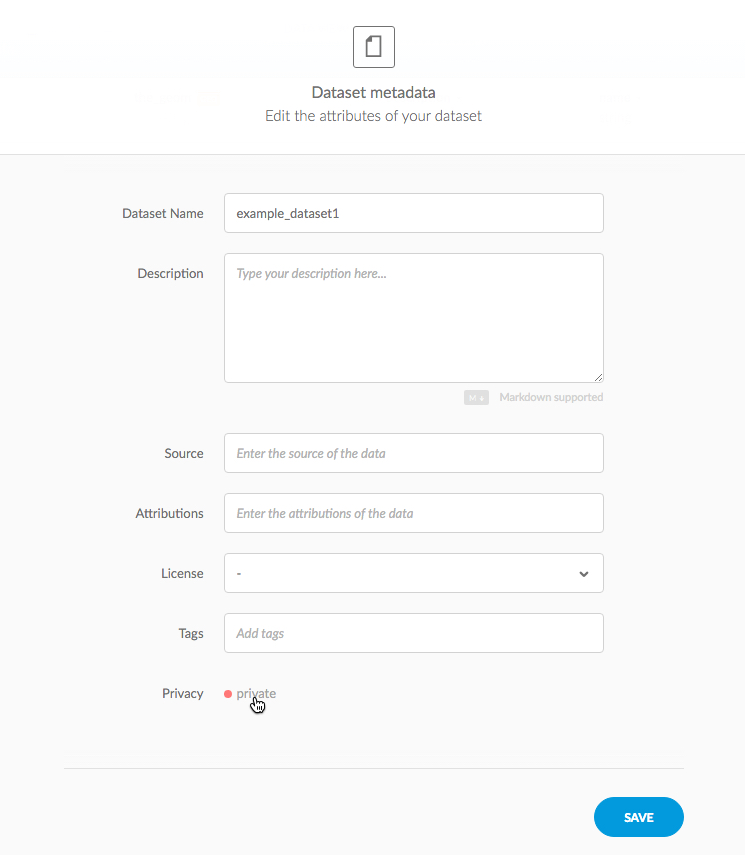
The following dataset metadata options are available.
Dataset Attribute Description Dataset name The name of the dataset. Note to be as specific as possible if your dataset is public Description Describe the content and purpose of your dataset Source Enter any details about the original source of the data Attributions Enter any copyright attribution information about the data layer License Add license information about sharing or using this dataset Tags Tags enable you to group your datasets by project or theme Privacy Datasets can be Private, Public or Links. Click the current status to change the privacy settings for the selected map -
Click SAVE to close and save the dataset metadata attributes
Tip: You can add a description, add tags, or edit the dataset privacy setting directly from the your Datasets dashboard. Once an initial dataset description and tag is entered using this shortcut, you must click Edit metadata from the selected dataset if you need to update these attributes again.

Delete Dataset
There are multiple ways to delete a dataset with the CARTO Editor. You can delete a dataset from your (dashboard) or directly from your (Data View).
To Delete a Dataset from your Dashboard
-
Visit the Data page
-
Select a dataset so that is it highlighted.
Tip: You can select multiple datasets to be deleted.
The dataset options appear at the top of the list.
-
Click Delete dataset from the datasets options

A confirmation dialog appears, indicating the number and/or name of the dataset(s) that you are deleting.
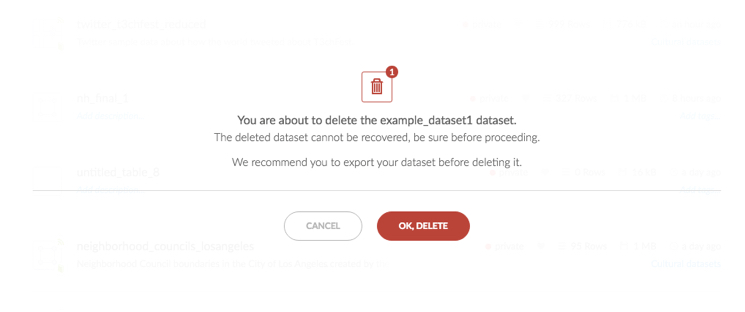
-
Click OK,DELETE
The dataset(s) is deleted and removed from your dashboard.
Note: Deleted datasets cannot be recovered and are permanently removed. It is recommended to export your dataset before deleting it if is important to you.
To Delete a Dataset from your Data View
-
Visit the Data page and select the name of the dataset to view
The page refreshes displaying the Data View for the selected dataset.
-
Select Delete this dataset from the Edit drop-down menu
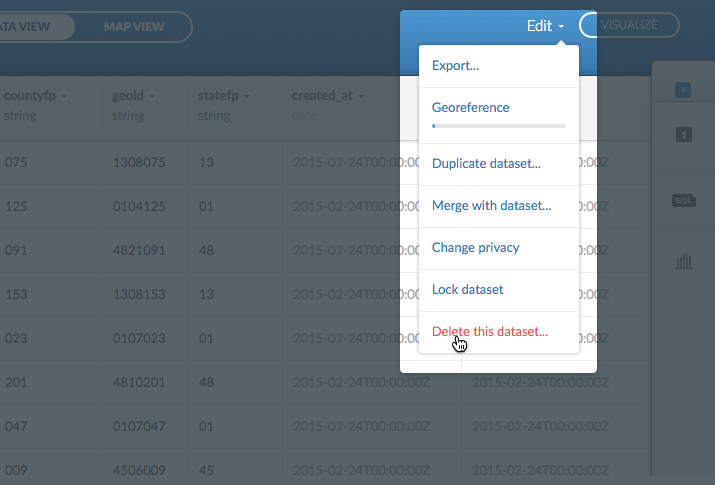
A confirmation dialog appears, indicating the name of the selected dataset that you are deleting.

-
Click OK,DELETE
The dataset is deleted and the page refreshes, displaying your datasets dashboard.
Viewing Datasets
Once you have connected a dataset, you can view your data with the DATA VIEW or the MAP VIEW. You can toggle between these two views.

Data View
Data View allows you to inspect, filter, and query your data and see the results in a spreadsheet format. The CARTO sidebar enables you to write SQL queries, apply basic filters, merge two uploaded datasets, and add rows and columns.
Map View
Map View allows you to inspect your data as a layer over a basemap. You may apply SQL queries or filters on the view, style the data’s symbology using our wizards (or by writing your own CartoCSS), and create infowindows.
In the Map View, you may style and filter your data but this view is not the same as a shareable map. In order to create a shareable map, click VISUALIZE.
Data Visualization
Once a dataset is connected, and you have customized your map, you can visualize how your map will appear when it is published. Visualizations store any filters or styles that you have applied to your map. If you have multiple layers applied to your map, you can also view how layers overlap with one another. This procedure describes how to visualize your data and create a map.
-
Click Your datasets from your dashboard drop-down menu
The datasets view appears, displaying all of your datasets.
-
Click the name of a dataset
The selected dataset opens in the Data View.
Tip: You can edit the privacy settings for your dataset.
-
Select VISUALIZE from the Data View or Map View of the selected map. A confirmation dialog appears, indicating that you must publish a map in order to visualize your data

-
Click, OK, CREATE MAP
A map is automatically generated based on the name of your dataset
Note: By default, a map is created and added to your Maps dashboard using the same name as the selected dataset. You can always rename the map with the map metadata options. Once a map is visualized, you can publish it.
Tip: If you need to save a draft of your map while applying changes to a newer version, it is suggested to duplicate your map so that you have a backup copy of it. The Duplicate map option is available from the Edit drop-down menu of the Data View or Map View of a selected map. Note that style changes applied to a duplicate map are not applied to the original.
Analyzing your Dataset
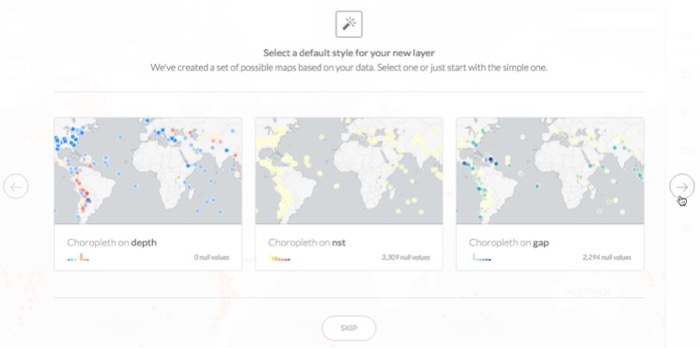
In some cases, when you connect a dataset and click on the MAP VIEW for the first time, the Analyzing dataset dialog appears. This analytical tool analyzes the data in each column, predicts how to visualize this data, and offers you snapshots of the visualized maps. You can select one of the possible map styles, or ignore the analyzing dataset suggestions.
CARTO built the algorithm for this feature to help you discover insights about your data, and to encourage you to select non-default map types for visualization. When you select an analyzing dataset option, the CartoCSS code is automatically applied and displays the map style instantly.
The following steps describe how the analyzing datasets options appear.
-
Your data is imported and appears in the DATA VIEW of your datasets dashbaord.
-
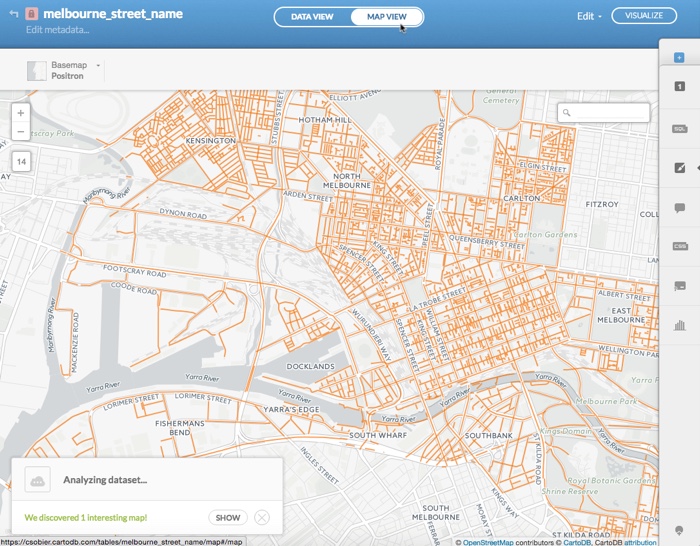
Click MAP VIEW
Default styling appears for your map and, depending on your data, the Analylzing dataset dialog appears.
-
Click SHOW to preview the suggested interesting map options based on select columns
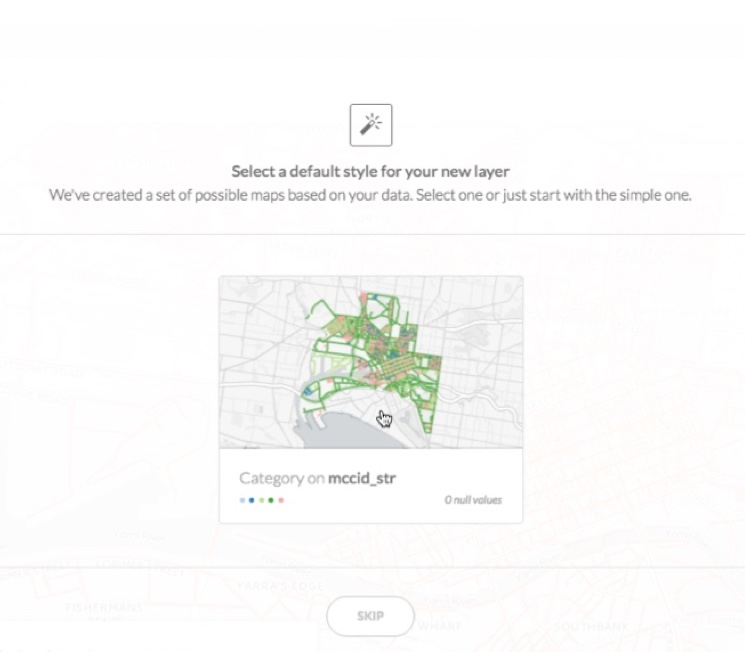
Tip: In some cases, several options may be available. Use the left and right arrow buttons to scroll and view all the options. Optionally, click SKIP to close these options.
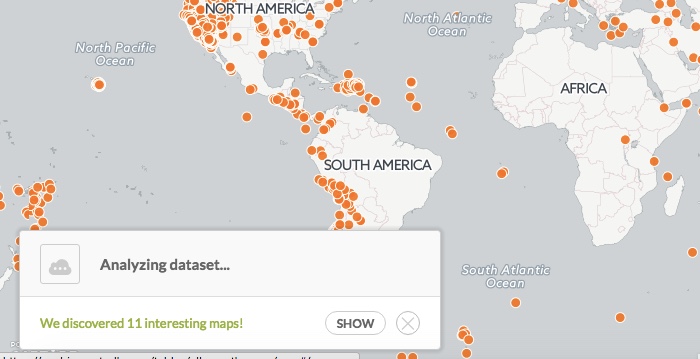
-
Click a previewed suggestion to apply it as the default style for your map layer
When you select an analyzing dataset option, the CartoCSS code is automatically applied and displays the map style instantly.
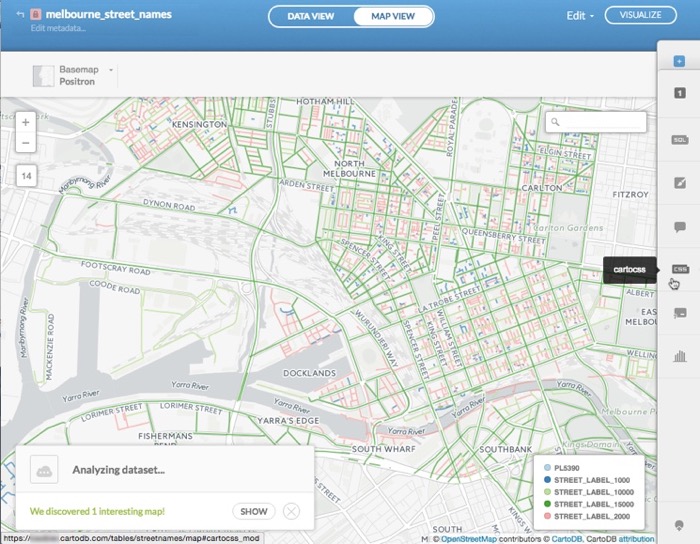
-
Click the X to close the Analyzing dataset dialog.
Note: The Analyzing dataset tool only appears once per dataset. Regardless of whether you choose a suggestion, or close the dialog box, it will not appear again. If you delete a dataset, and reimport it, CARTO stores the dataset name in a cache, so the analyzing dataset option does not reappear. A future version of this tool will allow the user to re-trigger the analysis.
Calculating the Analyzing Dataset Function
This section describes how the analyzing dataset function is calculated internally.
- When you upload data, it reads most of the columns. This excludes the
cartodb_idcolumn which is automatically generated when uploading a dataset to Carto. Other common columns such aslat,long,longitude, etc. are ignored - The columns are measured by applying an overall weight according to several metrics, such as: geometry, percentage of null values, number of distinct or unique categories
- For numeric data, the distribution type is calculated based on this function
- Based on the calculation results, an appropriate color ramp, and quantification method to change the appearance of the map, are identified
- The maps with a high enough weight are presented to the user in the calculated map style. These are the options that appear when clicking SHOW from the Analyzing dataset dialog box
Note: The Analyzing dataset function can only identify a Category, Choropleth, Bubble, or Torque map. Future analysis will include other map styles and suggest normalization. Additionally, the analyzing dataset tool identifies your column data based on the data type (number, _string, boolean, or time).
- If the column data type is weighted as mostly string data with a small number of unique categories, it is identified as a Category map
- If the column data type is weighted as mostly time data, it is identified as a basic Torque map
- If the column data type is weighted as mostly number data, it is identified as a Choropleth or Bubble map. In some cases it will be chosen to be a Category map if there are a small number of unique values.
Supported Data Types
When you upload your data to CARTO, it will automatically assign a data type to your data such as string, number, date, or boolean. It’s important to check that the correct data type is assigned. It is especially important to make sure CARTO knows if a column is a date type so maps that rely on temporal information such as Torque, animate correctly.
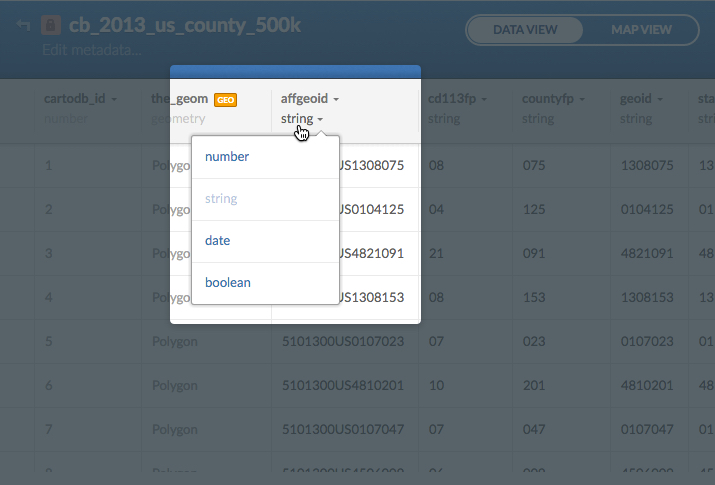
The data type is located under the column name. It can be changed by clicking on the date type name under the column name to open a secondary navigation window from which you can select the correct data type.
Edit Dataset Options
The following options are available from the Edit menu of the Data View or Map View of a selected dataset.
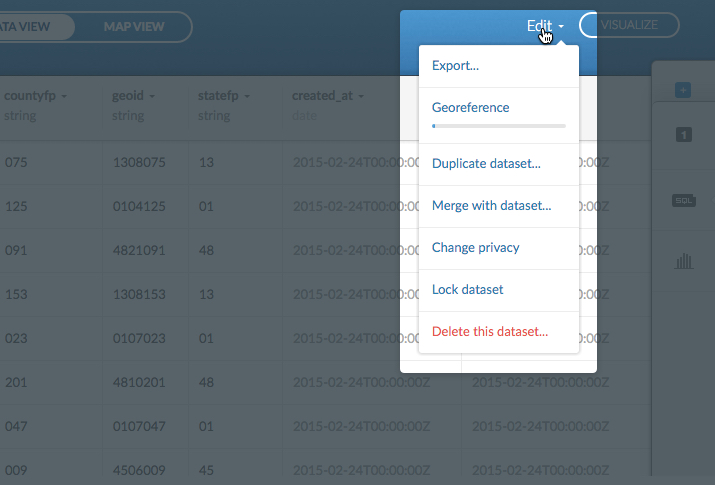
| Dataset Edit Menu Option | Description |
|---|---|
| Export | Export your dataset for use offline. For details, see how to Export Data |
| Georeference | Edit your dataset and apply geocoding coordinates to transform your data. For details, see Geocoding Data |
| Duplicate dataset | Creates a duplicate of your dataset so that you have a backup copy of it. Note that changes applied to a duplicate dataset are not applied to the original |
| Merge with dataset | Merge your current dataset with another existing dataset by performing a column join (merges two datasets based on a shared value) or a spatial join (merges two datasets based on a number of intersecting records). For details, see Merging Data |
| Change privacy | You can protect your dataset and identify the privacy setting. For details, see Dataset Privacy Settings |
| Lock dataset | To prevent your data from undesired changes, you can lock a dataset and hide it from your dashboard. For details, see the Frequently Asked Questions about how to lock a dataset or map |
| Delete this dataset | Delete the selected dataset. For details, see Delete Dataset Note: Deleting a dataset also deletes any connected maps to the dataset. |